06 Mar, 2023
Installing a Walk In Cooler
How To Install A Walk-In
Are you in the market for a new walk-in cooler or freezer but concerned about installation? The process of contacting multiple installers and getting quotes can certainly be a hassle. Not to mention worrying about the quality of the work and if the cost is reasonable. The simple answer is to have a manufacturer like Master-Bilt coordinate your installation so you can be confident of a job well done at a fair price. Master-Bilt has installation capabilities across the U.S. and Canada and we can assist with any job from a small 6×8 indoor walk-in to a large outdoor refrigerated warehouse. For added peace of mind, our installations are backed by the same warranty as our products.
Having said all that, if you have construction experience and want to tackle the job yourself, read below for general information and installation tips. Keep in mind Master-Bilt can also provide factory on-site assistance and training to help you get started out right on those larger projects.
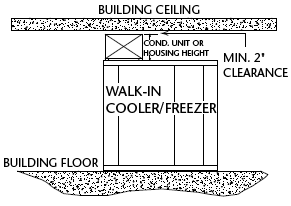
Ceiling And Wall Clearances
A successful walk-in assembly begins at the planning stage, so when determining the location and size of your walk-in, keep the following additional space requirements in mind.
When a ceiling mounted refrigeration system is used, the distance between the top of the walk-in and the building ceiling should be at least the height of the condensing unit housing plus an additional two inches to allow proper air circulation. For easier maintenance and service access, allow two feet from the top of the refrigeration system housing to the building ceiling.
Allow a minimum space of two inches between the ceiling of the walk-in and the building ceiling to permit installation of the walk-in ceiling..
Also allow a minimum of two inches between walk-in walls and building walls. The extra space compensates for irregularities in building construction and provides an air space which increases the walk-in’s operation efficiency.
Inspect For Damage
The first, and one of the most important steps in walk-in assembly, is to inspect all cartons and crates for damage as soon as your walk-in arrives. If you discover damage or if part of the shipment is missing, note it on all copies of the bill of lading prior to signing. If you find damage after your walk-in is uncrated, immediately call the delivering truck line and follow with a written report indicating concealed damage to your shipment.
Drawings, Diagrams And Parts
After the initial inspection, locate the packet of assembly drawings, wiring diagrams and parts that shipped along with your walk-in. These drawings and parts are essential in correct assembly of your walk-in.
Cam-Lock Operation
Most walk-in panels are connected by means of cam-lock fasteners. Before beginning assembly of a walk-in, it’s necessary to know how the cam-locks operate. During the cam-locking process, the arm of one lock extends into a lock in the opposite panel and over a locking pin. Turning the lock brings panels together for a secure seal.
For proper operation of the cam-locks, first position the walk-in panels so that you are facing the interior of the panel with the vertical latch access holes on the left side.
Then, make sure all cam-lock locking arms are in the “open” position before attempting to lock panels together. Activation of the locks requires a 5/16 inch hex wrench which is typically supplied with the walk-in.
Push the panels together and turn cam-wrench a quarter turn clockwise. This will engage the locking arm inside one panel over the locking pin in the other. Continue to turn cam-wrench for a half turn or until panels are fastened together securely.
It’s important to remember not to over-tighten cam fasteners. When the rotation of the cam-wrench stops due to normal tightening, the fastener has gone as far as it should. Over-tightening will break the cam fastener and the panels will not latch properly.
Leveling The Floor
An existing surface must be level before a walk-in is installed. If it’s not level, the walk-in floor panels must be leveled either by using a leveling bed or by placing shims between the existing surface and the floor panels. If shims are used, they should be rot-resistant wood, strips of galvanized metal or another sturdy material which will not deteriorate due to weather conditions. Shims under floor panels must be on 18-inch centers or less and across both length and width of the panels to provide adequate support for the walk-in and its contents. Shimming just the outer edges or corners will cause panels to break.
Floorless walk-ins must be attached either directly to the existing floor or to screeds. Screeds are U-shaped channels, typically vinyl, used to secure a floorless walk-in to a building floor. If the existing surface is not level, shims MUST be placed under the screeds or wall panels every eight inches or less. The shims used must be 4 or 5 inches wide to match the thickness of the wall panels or screeds.
Flooring Installation
If your walk-in has a floor, first lay out all floor panels in sequence as shown on assembly drawings and make sure they are level. Then fasten the panels to each other to provide a square and level base for the wall panels. Tighten the cam fasteners all the way so that the panels are evenly aligned and fit snugly.
For floorless walk-ins, manufacturers will usually provide floor angles to attach the bottom of all wall sections or screeds to the existing floor. Follow the previous leveling procedures if the existing floor is not level. Attach the floor angles to the existing floor before the wall panels or screeds are installed. Make sure that the angles are fastened to the floor straight and square, and that they are spaced so that the wall panels or screeds can be placed on top of the angle flange attached to the floor.
Wall And Ceiling Assembly
At this point, you’re ready for the walls and ceilings. First, lay out the wall panels or screeds as shown in the assembly drawings. Usually, the front of the walk-in is assembled first. However, if the walk-in is being installed inside an existing building or if space is restricted, it may be easier to begin at the rear, opposite the door wall. Remember to position the panels so that when you are facing the interior of the panel, the vertical latch access holes are on the left side of the panel.
As wall panels are assembled, make sure that the cam fasteners are completely tightened and that the panels are straight.
During assembly, if the wall panels have a stair-step appearance at the top, the floor is not level. In that case, stop immediately and follow the previous instructions on leveling the floor.
Assemble the wall panels of the front portion until you reach both corners. Then assemble ceiling sections to secure wall panels that are already in place. On small walk-ins, all walls and corners can be assembled prior to the installation of the ceiling. On larger walk-ins, you must support the wall panels already in place as you go with ceiling panels.
As ceiling panels are assembled, each one should be properly aligned to the adjoining ceiling and wall panels and locked into position securely.
Door And Frame Installation
After all the wall and ceiling panels are in place and aligned straight and square, you are ready to install the door and frame.
First, loosen the cam fasteners on the ceiling panel above the door frame and on the wall panels on each side of the door so that there is enough room for movement to set door frame in place.
Then, place a carpenter’s level against the door frame leg, or inside door opening to ensure that it is correctly aligned vertically and latch the door frame to the adjoining wall panel. Also place the level against the face of the door frame to ensure correct vertical alignment and latch the door frame to the ceiling panel while holding level in place.
Next, retighten the cam fasteners on the adjoining ceiling and wall panels and then attach the threshold plate.
Last, adjust the bottom wiper gasket of the door so that it sweeps when the door is closed. Do not adjust the wiper gasket so far down that it prevents the door from closing properly.
Caulking
Caulk where necessary between panels with a high-grade caulking to help make the walk-in as airtight as possible. The type of caulking required may vary according to building code standards and other appropriate regulations. Use the correct type of caulking for your application. One 10 oz. tube of caulking is required for approximately every 60 square feet of panel surface. Remember that on outside walk-ins, caulking ceiling joints will not seal the ceiling against water penetration. A weather-protective roof must be installed on top of the insulated ceiling panels.